Previous Next Sheriff CSM™
Sheriff CSM Administration and Configuration
During the course of using Sheriff CSM to manage and maintain network security in your environment, numerous changes will likely take place that will require you to make updates. Networks will change, assets will be added, upgraded, or removed; security objectives may change, and new thr tasks through various submenu options, which include the following:-
Administration — Provides options to manage users, system configuration, and backup and restore settings.
-
Deployment — Provides options to configure and manage Sheriff CSM components.
-
Threat Intelligence — Provides options to configure Sheriff CSM policies, actions, ports, directives, compliance mapping, correlation rules, data sources, and security classification (taxonomy). You can also review and edit the knowledge base, which contains information and recommended actions for different types of security incidents.
-
Open Threat Exchange (OTX) — Provides options to configure OTX settings and view individual OTX pulses and indicators of compromise (IoC) in a separate OTX browser window.
The Administration Page Display
When you select the Configuration > Administration option, Sheriff CSM displays the following page. The default Configuration > Administration display (labeled User Information) shows login and user information about current users. Users accessing this page can double-click on the row in the table containing their login name to view and update their own user profile information, including the ability to change their login username, email address, and password.
From the Users page, users can also choose the following display options:
The default Configuration > Administration display (labeled User Information) shows login and user information about current users. Users accessing this page can double-click on the row in the table containing their login name to view and update their own user profile information, including the ability to change their login username, email address, and password.
From the Users page, users can also choose the following display options: -
Activity — View and choose activities or actions that are logged.
-
Templates —View and update user access to different sections of the Sheriff CSM web UI.
-
Structure — View and make updates to the Asset and Inventory structures maintained by Sheriff CSM.
- Main — Provides options to view and update configuration settings for a number of Sheriff CSM features and functions that include Backup, IDM (identity management), Tickets, Login Methods, Metrics, Sheriff CSM Framework, Password Policy, User Activity, and Vulnerability Scanner.

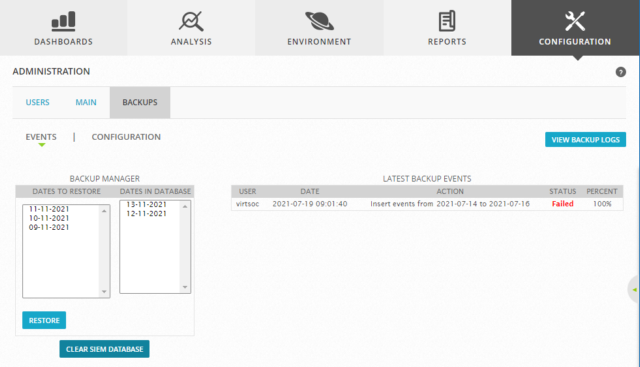
- Backups — Provides options to view backup logs and also view and update Backup Manager settings. Daily backups include all system configuration information including system profile, network configuration, asset inventory data, policy rules, plugins, and correlation directives.


-
Events (the default) — View event backup logs available to restore. See Back Up and Restore Events.
-
Configuration — View configuration backups available to restore. See Back Up and Restore System Configuration.
The Deployment Page Display
When you select the Configuration > Deployment option, Sheriff CSM displays the following page. The default Configuration > Deployment display provides status and resource information for different Sheriff CSM instance components: Sheriff Sensors (Deputies), Sheriff CSM Servers, and Sheriff CSM Loggers. Clicking on a selected component displays additional configuration detail, so that you can view and change configuration settings for existing components. The different page views for these categories also allow you to add and configure new components.
From the Components page, users can also choose the following display options:
The default Configuration > Deployment display provides status and resource information for different Sheriff CSM instance components: Sheriff Sensors (Deputies), Sheriff CSM Servers, and Sheriff CSM Loggers. Clicking on a selected component displays additional configuration detail, so that you can view and change configuration settings for existing components. The different page views for these categories also allow you to add and configure new components.
From the Components page, users can also choose the following display options: -
Sheriff Center (the default) — View status and resource usage statistics for Sheriff CSM components.
- Sensors —View information on deployed sensors.
-
Servers — View information and status of deployed Sheriff CSM Server hosts.
-
Remote Interfaces — Specify remote interface connections to additional, external Sheriff CSM devices. Once configured, users can quickly connect to these remote devices to display information about those devices. Selecting a remote interface launches a new window to log in and connect to the web interface of the associated Sheriff CSM device.
-
Smart Event Collection — Allows you to point to an existing log file, parse the log, and automatically generate parsing rules for events found in the log. You can then fine tune the configuration to generate a ready-to-deploy Sheriff CSM Sensor plugin.
-
Location — Provides options to view and modify Sheriff CSM network locations. You can also define new locations and add sensors to collect events for that location.
Threat Intelligence Page Display
Sheriff Threat Intelligence improves the effectiveness of your security monitoring efforts by helping you understand why alarms are generated. This allows you to evaluate more easily whether the events associated with an alarm are of real concern. Or, if the events triggering an alarm reflect normal behavior, you can modify policies to eliminate false positives. Note: You might also consider unsubscribing to OTXpulses whose Indicators of Compromise are creating too much noise and generating false positive alarms in Sheriff CSM. When you select Configuration > Threat Intelligence, Sheriff CSM displays the following page. The Configuration > Threat Intelligence display provides options for configuring Sheriff CSM policies, actions, ports, directives, compliance mapping, cross-correlation, data sources, and security classification (taxonomy). You can also review and edit knowledge base articles, which contain information describing possible attacks and recommended actions for combatting different types of security threats.
 - From the Policy page view, you can configure Sheriff CSM policies. Policies can be configured separately for events (from network devices) and correlation directive events (generated by Sheriff CSM Server). You can also configure policy groups, which allow you to group policies for administrative purposes.
- From the Actions page view, you can configure actions to take in response to a specified condition, which may be an alarm or the logical expression of a condition. Actions include sending an email message, creating a Sheriff CSM ticket, or executing an external program or script. In defining an action, Sheriff CSM provides a list of keywords that you can specify that will be substituted within any field of the action definition.
- From the Ports page view, you can view current assignments of ports used by Sheriff CSM and also add new ports you want to use for other services, mirrored ports, network taps, scans, and so on. In addition, you can view, modify, or create new port groups.
- From the Directives page view, you can view, modify, or clone existing correlation directives. You can also create and test new directives. All pre-defined directives are listed under the Sheriff directive, separated into a number of different categories, based on the specific method of attack or intrusion that the directives address. Any custom directives are listed under the User Contributed section.
- From the Compliance Mapping page view, you can view and update coverage of security controls to meet ISO 27001, PCI DSS 2.0, and PCI DSS 3.0 compliance regulations, if specified. For each regulation, you can review each requirement, determine if security controls are implemented, and view what data sources and directives are used, or are available, to check compliance for a specific compliance requirement. In addition, you can click Run Scripts to run scripts defined for a specific compliance regulation.
- From the Cross Correlation page view, you can view and modify existing cross-correlation rules and the associated data sources used to collect data to check the associated rule. You can also create new cross-correlation rules or delete rules. Clicking on a specific cross-correlation rule displays the detail of the rule definition, where you can change the data source and reference for the rule, the event type, and the reference SID name.
- From the Data Source page view, you can view and edit details of data sources, which refer to all applications or devices (most commonly, plugins) that generates information that Sheriff CSM can collect, analyze, and translate into an event within the Sheriff CSM taxonomy. Each data source also describes every possible event that might occur, to enable Sheriff CSM risk assessment and correlation to match policies. Sheriff CSM also lets you organize data sources into Data Source Groups, which makes it easier to incorporate multiple data sources into one policy.
- From the Taxonomy page view, you can view and edit the Sheriff CSM taxonomy (and add new categories and subcategories), which provides a hierarchical arrangement of attack method categories and subcategories (also referred to as event types and subtypes), and their associated data sources, by which policies can match events.
- From the Knowledge Base page view, you can view and edit articles (documents), and add new articles (documents) to the Sheriff knowledge base. The knowledge base lists known and possible attack events, provides a thorough description of each attack, and describes methods of detection, analysis, and remediation that might be implemented as part of an organization’s incident response process to counter an attack.
The Open Threat Exchange (OTX) Page Display
OTX is an open information-sharing and analysis network that provides access to real-time information about issues and attack threats that may impact your organization, allowing you to learn from and work with others who have already experienced such attacks. AT&T Alien Labs™ and other security researchers constantly monitor, analyze, reverse engineer, and reports on sophisticated threats including malware, botnets, phishing campaigns, and more. When you select the Configuration > Open Threat Exchange option, Sheriff CSM displays the following page. The Configuration > Open Threat Exchange page provides options to manage your OTX subscription account and OTX keys, and displays a listing of descriptions of the most current threats or attacks that are affecting IT organizations around the world. For each threat description, the abstract also provides tag (keyword) links you can click on to view related OTX pulses that are related to the same threat. In addition, you can click the View In OTX button to open (on a separate page) a more detailed description of the threat that includes reference links and groups, statistics and metrics, and Indicators of Compromise (IoC) for the threat. From the list of IoCs displayed for a threat, you can also click on an individual indicator of compromise to see more information about analysis of the threat, and how to detect and identify an attack if it is attempted in your network environment.