Previous Next Sheriff CSM™
Security Events Views
The Security Events (SIEM) page, under Analysis > Security Events (SIEM), consists of two views: SIEM View and Real-Time View. You can also create your own Custom Views with specific search criteria and column selections.SIEM View
This view offers search and robust filtering categories for isolating types of events to review. From the tabular summary listing of events, you can click on a specific event row to view further details about that event in a popup window. You can also click the More Details (

- Event ID
- Payload
- IDM Username
- IDM Hostname
- IDM Domain
- Src or Dst IP
- Src IP
- Dst IP
- Src or Dst Host
- Src Host
- Dst Host
Using the filtering categories at the top of the Security Events (SIEM) page, you can search for specific events. For example,
- Events having the same host as the traffic that triggered an alarm.
- Events coming through the same Sensor (Deputy).
- Events based on OTX pulses or on OTX IP Reputation.
| Filter Name | Description |
| Show Events | Date oriented filters, including a range filter, so that you can search events occurring within a specific time period. |
| Userdata list | Allows you to select from userdata1~userdata9, filename, username, or password to create a search criterion. Select the operator you want to use and enter the keyword in the field. |
| Data Sources | External applications whose data are collected and evaluated by a plugin, and translated into an event within the Sheriff CSM taxonomy. |
| Data Source Groups | A predefined list of usually related data sources, such as directive events. |
| Sensors (Deputies) | Sheriff CSM Sensor that captured the event. Select "Exclude" if you want to exclude events from this Sensor instead. |
| Asset Groups | List of predefined asset groups. |
| Network Groups | List of predefined network groups. |
| Risk | Risk level of the event, which can be Low (0), Medium (1), or High (>= 2). Risk calculation is based on the formula: Asset Value * Event Reliability * Event Priority / 25 = Risk. If Asset Value = 3, Reliability = 2 and Priority = 2, the risk would be 3 * 2 * 2 / 25 = 0.48 (rounded down to 0). Risk is Low. |
| OTX IP Reputation | Clicking the list icon expands the list to show a set of IP Reputation filters. These let you see all events with IP Reputation data or, alternatively, only events with IP Reputation data of a specified severity level, or type of malicious activity. IP Reputation ranks severity based on the number of reports existing about an IP address, as well as the nature of the threat the IP poses. |
| OTX Pulse | Double-clicking this field expands a list of pulse names, from which you then select a pulse to review as an event. If you know the pulse name, you can type it within the field. This quickly displays the pulse from the list. |
| Only OTX Pulse Activity | Shows all events within your environment resulting solely from OTX pulse indicators. Note: You cannot filter on events with IP Reputation data and OTX pulses simultaneously. |
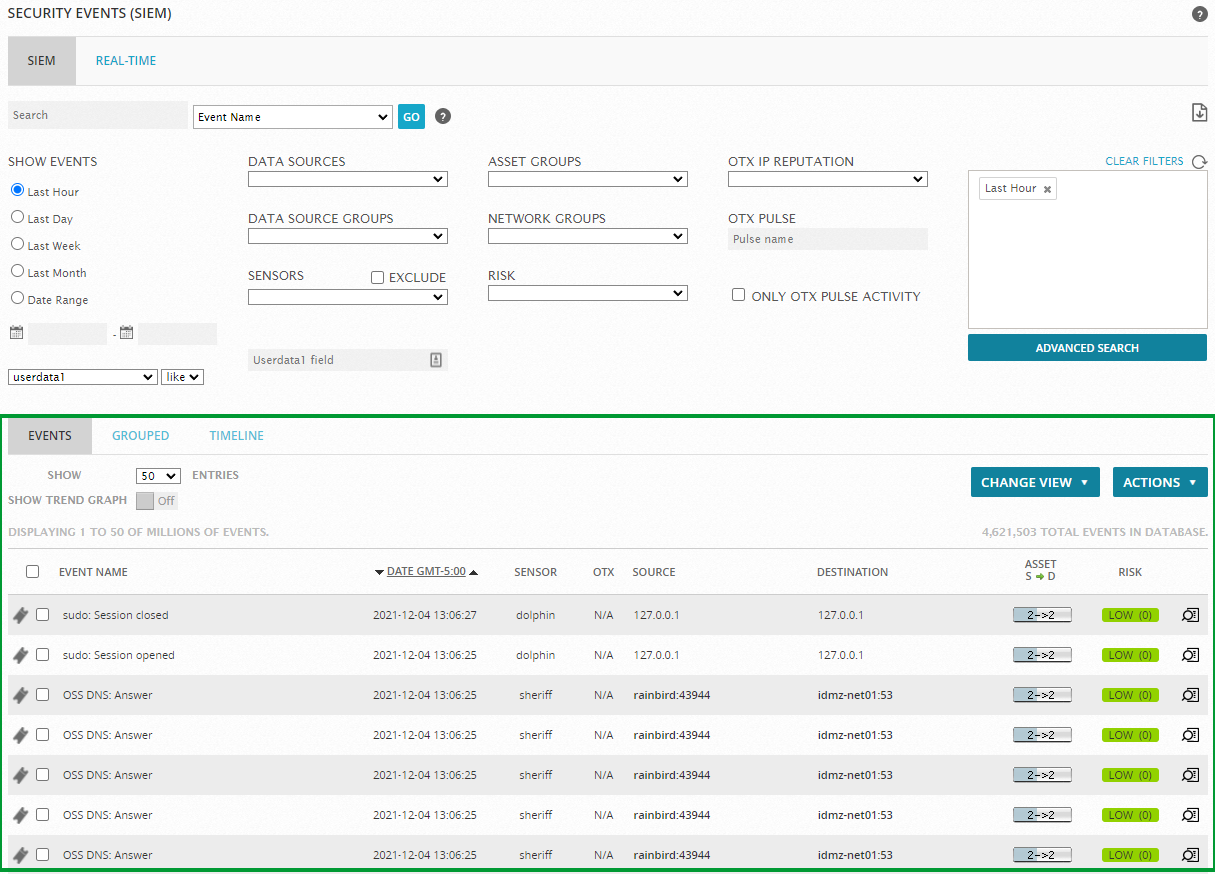 SIEM Events list columns in the Default view
| Column Name | Description |
|---|---|
| Event Name | Name of the event. |
| Date | Date and time registered by Sheriff CSM for the event. Date and time are user configured. |
| Sensor | Name of Sheriff CSM Sensor detecting the event. |
| OTX |
|
| Source | Hostname or IP address of the host, with national flag if country is known, that initiates the event. |
| Destination | Hostname or IP address of the host, with national flag if country is known, that receives the event. |
| Risk | Risk level of the event, which can be Low (0), Medium (1), or High (>= 2). Risk calculation is based on the formula: Asset Value * Event Reliability * Event Priority / 25 = Risk. if Asset Value = 3, Reliability = 2 and Priority = 2, the risk would be 3 * 2 * 2 / 25 = 0.48 (rounded down to 0). Risk is Low. |
| Magnifying glass icon ( | Clicking the magnifying glass takes you to the Event Details. (See Review Event Details.) Note: You can go to Event Details by clicking anywhere within the event, with the exception of the OTX icon. |
 For example, the Look up in OTX option opens the OTX site to display potential and reported threats related to the selected location. If no threat information is found about the location, the Look Up in OTX option opens the Create New Pulse web page in OTX, which lets you create a new Pulse to report a possible new threat.
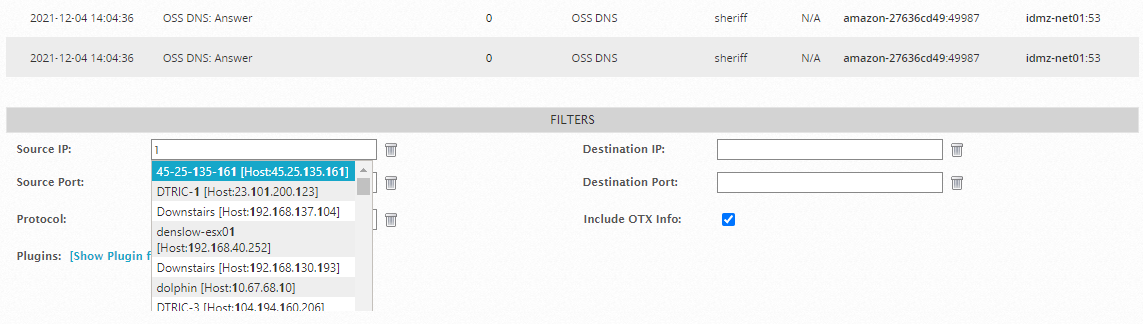
Real-Time View
The Real-Time view shows you an up-to-the-minute snapshot of all events occurring within your system. This view may or may not contain any OTX data, depending on what events are currently transpiring in your system.-
Left-click or start typing inside of the field
This expands a list of filters for you to select from:
-
Type the filter identifier into the field.
The display jumps to that entry in the list.
-
If Sheriff CSM does not find real-time events for that filter, the Events list appears empty.
-
Click the Show Plugin filter
A list of all supported system plugins displays at the bottom of the page. Not all of these are necessarily installed on your system. You must verify which plugins match your Sheriff CSM deployment.
Custom Views
When examining the Events list, Sheriff CSM allows you to edit the default views or create custom views with your specific search criteria and column selections. To create a custom view for events- Go to Analysis > Security Events (SIEM) and perform a search to include the events you want to see.
-
Click Change View to select a predefined view.
Predefined views include Default, Taxonomy, Reputation, Detail, Risk Analysis, and IDM. Each view displays the same events but with different columns.
-
Alternatively, click Change View and then select Create New View.
- In Create New Custom View, select the columns you want to see in this view.
- To apply the same query every time when you launch this view, select Include custom search criteria in this predefined view.
- Type a name for the view, and then click Create.
-
On Analysis > Security Events (SIEM), click Change View to select the view you want to delete.
-
Click Change View again and select Edit Current View.
-
In Edit Current View, click Delete at the bottom.
-
Confirm the action when prompted.
Sheriff CSM deletes the corresponding view and refreshes the page to display the Default view.
Topic revision: 03 Jun 2022, SheriffCyberSecurity