Previous Next Sheriff CSM™ Adding Assets Sheriff CSM provides different ways to add your assets: Note: The Sheriff CSM system inserts new assets automatically if they are identified through passive asset monitoring, vulnerability scans (if and when vulnerabilities are found), or through IDM events.
The Getting Started Wizard is available on Sheriff CSM All-in-One during the initial setup. This wizard includes the initial tasks for getting Sheriff CSM ready for deployment. As a result, the wizard collects as much data as possible to analyze and identify threats in your environment. One of these tasks is to discover assets using a network scan through the following methods:
- Scanning networks configured in a previous step of the wizard.
- Scanning networks imported from a CSV file.
- Scanning networks added manually.
- Importing assets from a CSV file.
- Adding assets manually.
-
Go to Environment > Assets & Groups > Assets.
-
Click Add Assets, in the upper right-hand corner, and then Scan For New Assets.
-
Select the assets you want to scan:
- Click the + sign to expand the branches in the All Assets tree and click your selection.
- Alternatively, type the name of a specific asset/network in the search box, then press Enter.
-
Select a Sensor (Deputy).
- Local means that Sheriff CSM uses the Sensor on the All-in-One, and Automatic means that Sheriff CSM uses the first Sensor available.
- Alternatively, click Select a Specific Sensor to display a list of Sensors, choose one from the list.
-
Select the Advanced Options according to your network capacity.
For the meaning of these options, click here.
-
Click Start Scan.
After it completes, the scan result displays in the same page below the Start Scan button.
-
Click Update Managed Assets to save assets.
Sheriff CSM adds new assets and updates the existing ones if some of the properties have changed.
For field descriptions, click here.
-
Go to Environment > Assets & Groups > Schedule Scan > Asset Discovery Scan.
-
Click Schedule New Scan towards the right.
-
Type a name for the new scan.
-
Type the target network or networks to scan. You can type a unique CIDR (x.x.x.x/xx) or a CIDR list separated by commas, CIDR1, CIDR2, CIDR3, ..., up to 14 addresses.
Warning: You will not be able to save the scan if you try to add more than 14 CIDR addresses.
-
Select a Sensor from the list.
-
Select the advanced options according to your network capacity. For a description of these options, see Advanced options for asset scans.
-
Select scan frequency. The options are Hourly, Daily, Weekly, or Monthly.
The next scan runs an hour, a day, a week, or a month, respectively, after the previous scan has finished.
-
Click Save.
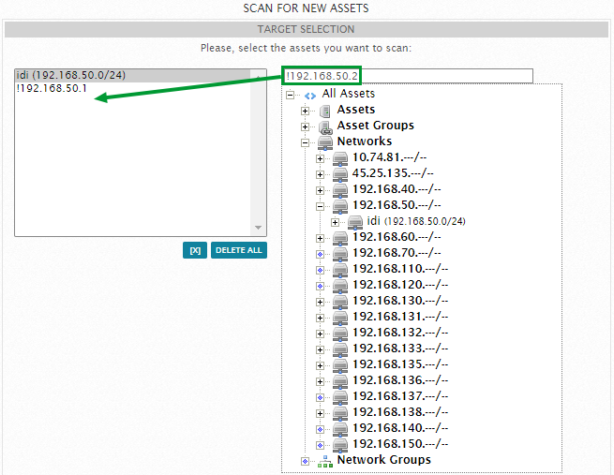
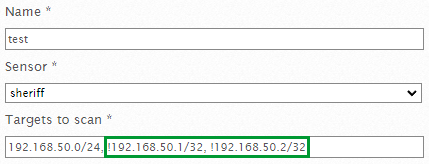
192.168.50.1 and 192.168.50.2 while scanning the 192.168.50.0/24 network.
Example: Excluding assets from a manual asset scan:
 Example: Excluding assets from a scheduled asset scan:

"IPs(IP1,IP2,...)"*;"Hostname";"FQDNs(FQDN1,FQDN2,...)";"Description";"Asset Value";"Operating System";"Latitude";"Longitude";"Asset ID";"External Asset";"Device Types(Type1,Type2,...)"Where:
-
Delimiter is a semicolon.
-
The IPs field is mandatory.
-
Hostname syntax is defined by RFC 1123.
-
!FQDN syntax is defined by RFC 1035, RFC 1123, and RFC 2181.
-
Valid operating system values include: Windows, Linux, FreeBSD, NetBSD, OpenSD, MacOS, Solaris, Cisco, AIX, HP-UX, Tru64, IRIX, BSD/OS, SunOS, Plan9, or iOS
-
The Asset ID field can be left blank. Sheriff CSM imports the asset and assigns it a new asset ID. If you provide an asset ID and the asset already exists in the system, Sheriff CSM will update this asset with the values in your CSV file.
-
Device types follows this syntax: Device Category:Device Type. For example, if you are importing a network router, the value for the device type field should be Network Device:Router.
For accepted values, click here.
"IPs";"Hostname";"FQDNs";"Description";"Asset Value";"Operating System";"Latitude";"Longitude";"Asset ID";"External Asset";"Device Type"For example, with the file below, you add a host with the IP address of 192.168.10.3:
"IPs";"Hostname";"FQDNs";"Description";"Asset Value";"Operating System";"Latitude";"Longitude";"Asset ID";"External Asset";"Device Type"
"192.168.10.3";"Host1";"www.example -1.es,www.example -2.es";"This is a test server.";"2";"Windows";"23.78";"121.45";"379D45C0BBF22B4458BD2F8EE09ECCC2";0;"Server:Mail Server"
To add assets by using a CSV file
-
Go to Environment > Assets & Groups > Assets.
-
Click Add Assets at the upper right-hand corner and then Import CSV.
-
Click Choose File and select a CSV file. If you have special characters in the hostnames and want to ignore them, click the square next to Ignore invalid characters (Hostnames).
-
Click Import.
After it finishes, the result page shows the number of assets imported, plus the number of errors and warnings that occurred during the import. You also see an import status summary on every line of the CSV file.
- To see the details on an error or a warning, click the
 icon.
icon.
-
To import more assets, click New Importation; alternatively, to close the window, click the
 icon located at the upper right-hand corner.
-
Go to Environment > Assets & Groups > Assets.
-
Click Add Assets at the upper right-hand corner and then Import from SIEM.
The Import Assets from SIEM Events message displays. It shows the number of assets found.
-
Click View Log if you want to read the log file.
-
Click Import to transfer the identified assets.
While naming an asset in Sheriff CSM, keep the following rules in mind that an asset name
- Cannot contain any dot (.).
- Cannot start or end with a dash (-).
- Cannot contain a space.
- Can start or end with a letter or a number.
- Can only contain up to 63 characters.
To add assets manually
-
Go to Environment > Assets & Groups > Assets.
-
Click Add Assets at the upper right-hand corner, and then Add Host.
-
On the New Asset page, fill out the fields.
-
Click Save.
The Asset Detail page for this asset displays.
| Column / Field Name | Required or Optional | Description |
|---|---|---|
| Name | Required | Name of the asset. |
| IP Address | Required | IP address for the asset. |
| FQDN/Aliases | Optional | Domain name that specifies its exact location in the tree hierarchy of the Domain Name System (DNS). |
| Asset Value | Required | Value assigned to the asset. For further information, see Asset Value and Event Risk Calculation. |
| External Asset | Required | Whether the asset is on your company network (internal) or not (external). See What Are External Assets?. |
| Sensors | Required | A list of Sheriff CSM Sensors with a check mark next to the one monitoring this asset. |
| Operating System | Optional | Operating System on the asset. |
| Description | Optional | A short description for the asset. |
| Icon | Optional | Provide an image for the asset, if desired. The accepted image size is 400 x 400 and the allowed formats are .png, .jpg or .gif. |
| Location | Optional | Location of the asset. The written location appears on the map. You can also use latitude and longitude to locate the place. |
| Model | Optional | Model that identifies the asset. |
| Device Types | Optional | Device type of the asset. Select an option from the Devices list to review options in the Types list. The options are the same as in Sheriff CSM accepted device types. |


