Previous Next Sheriff CSM™
Microsoft IIS FTP Server through NXLog
The Microsoft Internet Information Services (IIS) Management Pack includes a FTP Server that you can configure. See vendor website for documentation. When you configure the Microsoft IIS FTP Server to send log data to Sheriff CSM, you can use the Microsoft Windows IIS FTP Server plugin to translate raw log data into normalized events for analysis. The table below provides some basic information for the plugin: Plugin Information| Device | Details |
|---|---|
| Vendor | Microsoft |
| Device Type | Server |
| Connection Type | Syslog |
| Data Source Name | winftp-nxlog |
| Data Source ID | 1916 |
Integrating Microsoft IIS FTP Server and NXLog
Before configuring NXLog in Sheriff CSM, you must configure FTP logging in IIS.Configure FTP Logging
To configure FTP Logging in IIS Manager-
Open IIS Manager.
- In the Connections tab, select either the server or the site, and then click the FTP Logging icon.
-
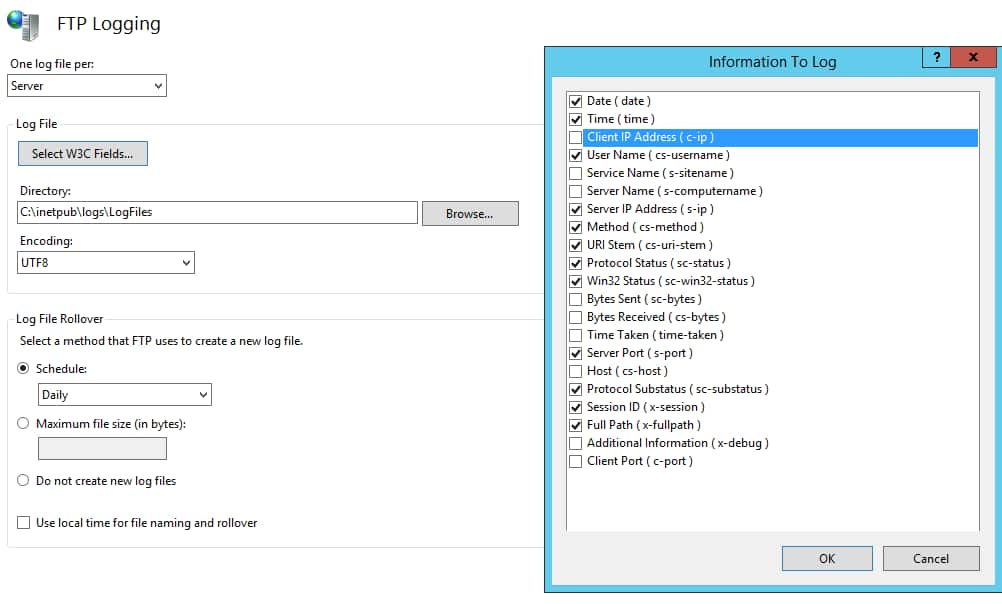
Under Log File, click Select W3C Fields, and then select the information you want to log.
Make sure to select the items checked in the screenshot below and click OK.
-
Select UTF8 under Encoding and Daily under Schedule.
-
Click Apply.
- Restart the FTP Server for the changes to take effect.
Configure NXLog on Windows
To send log data through NXLog to Sheriff CSM-
If not done already, download nxlog.conf, and then place it in the
confdirectory of your NXLog installation. Depending on which version you use, the directory can beC:\Program Files (x86)\nxlog\conffor the 32-bit version or C:\Program Files\nxlog\conf for the 64-bit version.Note: This step overwrites the default
nxlog.conffile. You may want to back up the original copy before placing the one provided by AT&T Cybersecurity. - Open the
nxlog.conffile in a text editor. -
Update the root path of your NXLog installation.
-
Locate the following lines:
#define ROOT C:\Program Files\nxlog
#define ROOT C:\Program Files (x86)\nxlog
- Uncomment the path that matches the NXLog installation on your Windows machine.
-
-
Enter the Sheriff CSM Sensor (Deputy) IP address.
-
Locate the following line:
define OUTPUT_DESTINATION_ADDRESS <gap Sheriff-CSM-Sensor-IP>
- Replace
<Sheriff-CSM-Sensor-IP>with the IP address of the Sheriff CSM All-in-One or Sheriff CSM Sensor that will receive the Windows events.
-
-
Uncomment the section between FTP-NXLOG and /FTP-NXLOG.
Important: Only remove the first # symbol in each line when uncommenting the sections. The remaining # symbol indicates that the line is either a comment or optional.
-
In addition, uncomment the following lines, above the DHCP-NXLOG section:
#<Extension json>
# Module xm_json
#</Extension>
-
Save the file.
- Start or restart the NXLog service.
Plugin Enablement
For plugin enablement information, see Enable Plugins. If enabling the plugin on assets, you will find it listed as Microsoft : Windows IIS FTP Server : NXLog.