Previous Next Sheriff CSM™
File Integrity Monitoring
You can configure Sheriff HIDS to perform File Integrity Monitoring (FIM), which identifies changes in system files, folders, and Microsoft Windows registries. The process that identifies these changes is syscheck. The syscheck process scans the host at user-defined intervals and stores checksums of watched files. The system then generates an event when a checksum changes. In addition to using syscheck, you can also configure Windows systems so that Sheriff HIDS agents forward object access audit events for Sheriff CSM to process. These events provide more information on operations affecting file and folder objects, such as who performed specific actions or operations on an object. For more information, see Configuring Windows Systems to View Windows Audit Object Access Events.Configuring File Integrity Monitoring
Every HIDS agent includes anossec.conf file with some default settings for syscheck. On Microsoft Windows hosts, you can find this file in C:\Program Files (x86)\ossec-agent, and on Linux, in /var/ossec/etc.
When you make changes through the Sheriff CSM web interface, Sheriff CSM records your modifications in the agent.conf file and stores it for distribution. When the agent authenticates, it will download the shared configuration and merge it with the local copy. The shared file will take precedence, overwriting any local configuration.
Default settings for the ossec.conf file stored on a host system are configured when the HIDS agent is first installed or deployed on a host system. In addition, an ossec.conf file containing syscheck and other global options is defined and stored on theSheriff CSM Server. For more information on viewing and configuring this file, see To configure Sheriff CSM server-side (global) ossec.conf settings.
To change syscheck options for all agents - Go to Environment > Detection.
-
On HIDS, click Agents, and then click Syschecks.
-
Configure the optionsshe according to your needs.
-
Click Save after making changes in each section.
- (Optional) Click Agent.conf to confirm the changes in XML format.
-
To apply your changes immediately, click HIDS Control, and then Restart.
- Go to Environment > Detection.
-
On HIDS, click Config, and then click Syschecks.
-
Configure the options according to your needs.
-
You can also view the contents of the server
ossec.conffile in XML format by selecting the Config > Configuration option.
| Options | Meanings | Default Values | |
| Frequency | Frequency at which the syscheck executes (in seconds). | 72000s (20h) | |
| Scan_day | Day of the week to run the scans. | None | |
| Alert New Files | Whether to alert on new files created. (Global agent option; not configurable for individual hosts.) | No | |
| Scan Time | Time to start the scans. | None | |
| Auto Ignore | Whether to ignore files that change too often. (Global agent option; not configurable for individual hosts.) | No | |
| Scan on Start | Whether to do the first scan as soon as the agent starts. | Yes | |
| Windows Registry Entries Monitored | Microsoft Windows registries to monitor. | See the ossec.conf file on a Windows host | |
| Registry Entries Ignored | Microsoft Windows registries not to monitor. | See the ossec.conf file on a Windows host | |
| Files/Directories Monitored | Files or directories to monitor. | See the ossec.conf file on a Windows host | |
| Realtime | Real time or continuous monitoring on Linux (using the inotify system calls) and Windows systems. | No | |
| Report Changes | (Linux‑like systems only) Whether to report file changes. Limited to text files. | No | |
| Chk All | Checks all changes listed below. | No | |
| Chk Sum | Check the md5 and sha1 hashes of the files. | No | |
| Chk Sha1sum | Check the sha1 hashes of the files. | No | |
| Chk Size | Checks the size of the files. | No | |
| Chk Owner | Checks the owner of the files. | No | |
| Chk Group | Checks the group owner of the files/directories. | No | |
| Chk Perm | Checks the permission of the files/directories. | No | |
| File/Directories Ignored | Files or directories not to monitor. | See the ossec.conf file on a Windows host | |
About Auto Ignore and Realtime
With Auto Ignore set to No, you receive alerts on every file change, regardless how many times it is changed. If you also select the Realtime option, the alert stops after the third change, equivalent to setting Auto Ignore toYes.
About Alert New Files
You can configure Sheriff HIDS to alert on new files, but it does not report in real time, because Sheriff HIDS can only detect new files on a full scan. To enable alerting on new files- Change Alert New Files to Yes.
- Specify the directory in which to detect the new files.
- Select Chk All.
About Report Changes
Thereport_changes option is only available on UNIX-like systems. Setting this option globally, or reporting on changes to the root file system, will likely create a large number of events, which could potentially fill up all available disk space and impact Sheriff CSM operation.
Specifying Different Syscheck Options for Different Hosts
You can configure different syscheck options for different hosts, by entering them in theagent.conf file manually. Ensure that you
- Use a separate
<agent_config>element for each host you need to configure. - Use the name attribute to denote the name of the host. (This is the agent name used when adding the agent to the detection section.)
- Specify the options you want to change inside the
<syscheck>element. - Repeat all every host you want to configure.
<agent_config name="AD2012">
<syscheck>
<frequency>21600</frequency>
<scan_on_start>yes</scan_on_start>
<directories check_all="yes">C:\temp</directories>
</syscheck>
</agent_config>
<agent_config name="Win2008">
<syscheck>
<frequency>3600</frequency>
<scan_on_start>yes</scan_on_start>
<directories check_all="yes">C:\topsecret</directories>
</syscheck>
</agent_config>Him
Instead of making these changes on the hosts one-by-one, you can configure them in the Sheriff CSM web interface. To configure different syscheck options for different hosts
- Go to Environment > Detection.
-
On HIDS, click Agents > Agent.conf.
By default, this page is blank.
-
Type or paste in the changes you want to make.
- Click Save.
-
(Optional) Click Syscheck. Notice that a list appears towards the upper-right corner with the name of the first entry in
agent.conf.
- To apply your changes immediately, click !HIDS Control, and then Restart.

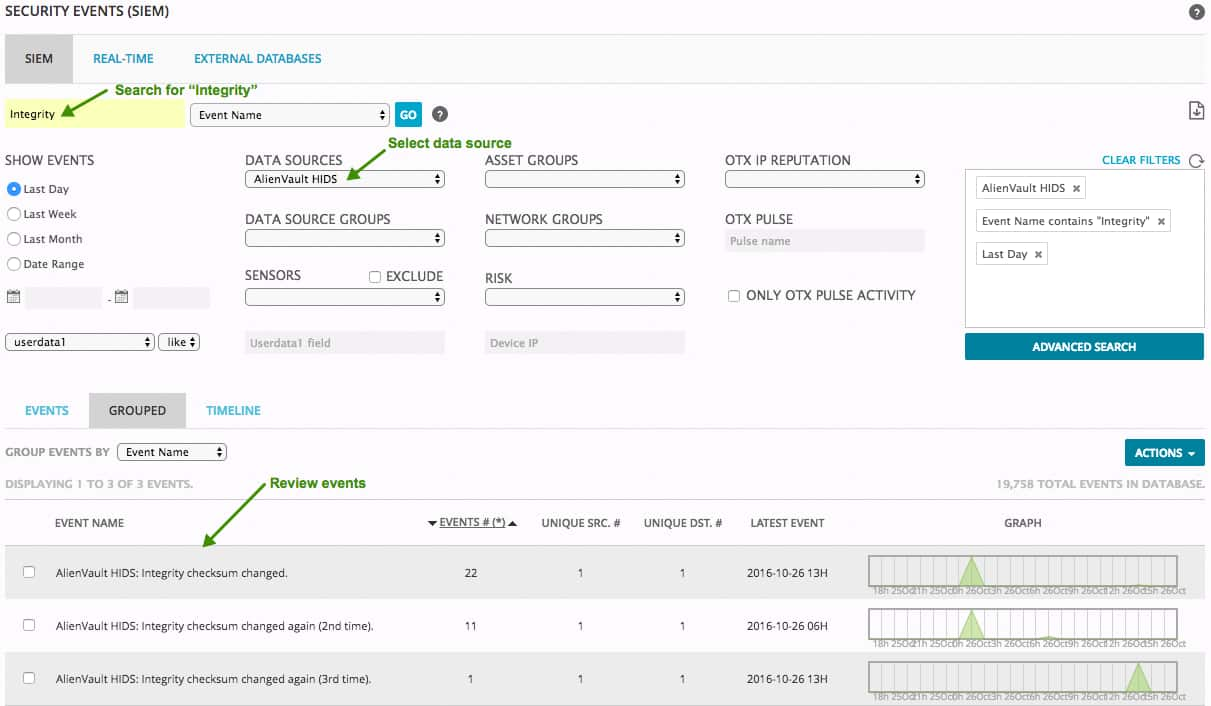
Viewing the File Integrity Monitoring Events
Each time a Sheriff HIDS agent detects a change in a monitored file or directory, Sheriff CSM creates an event and stores it in the database. To view FIM events-
Go to Analysis > Security Events (SIEM).
-
In Data Sources, select "Sheriff HIDS".
- In Event Name, type "Integrity".
-
Click Go.

-
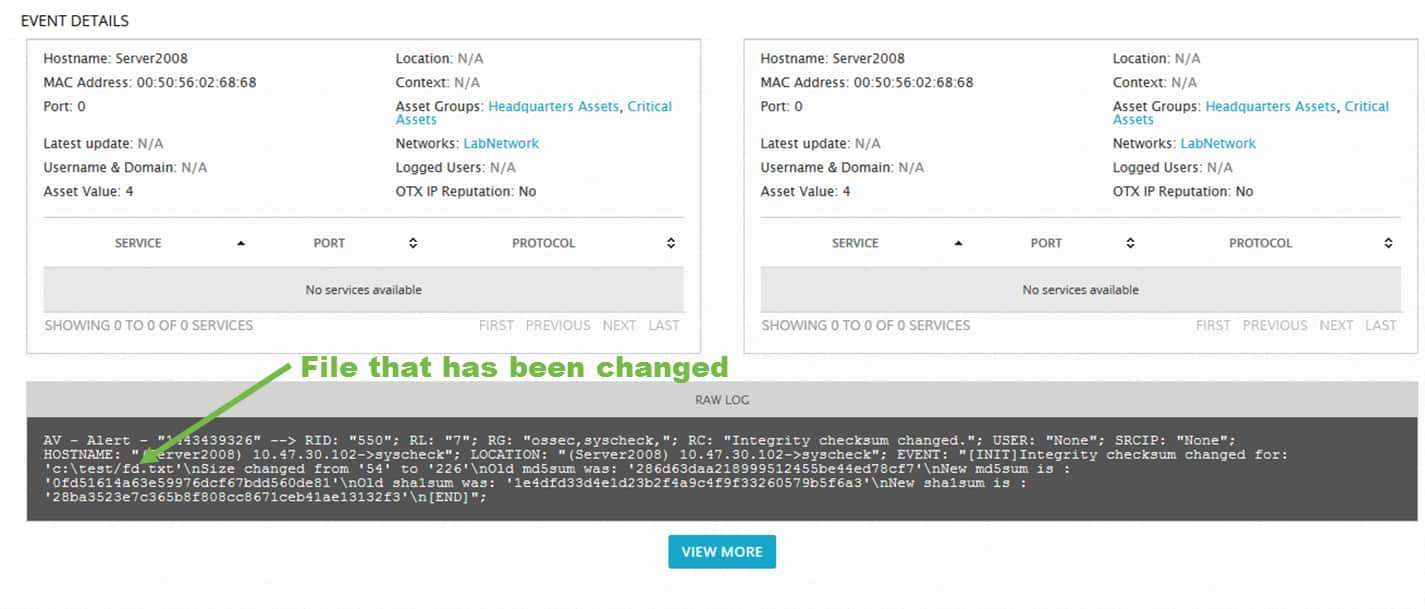
View event details to determine which file has changed.

Configuring Windows Systems to View Windows Audit Object Access Events
To configure Windows systems so that Sheriff CSM can view Windows audit object access events, you need to first edit local security policy settings. After applying policy changes to include audit object events in Windows security logs, the Sheriff HIDS agent will forward those events to Sheriff CSM. Note: You can only set up file and folder auditing on NTFS drives. To define policy settings for object access audit events-
On a selected Windows system, open the Local Group Policy Editor.
-
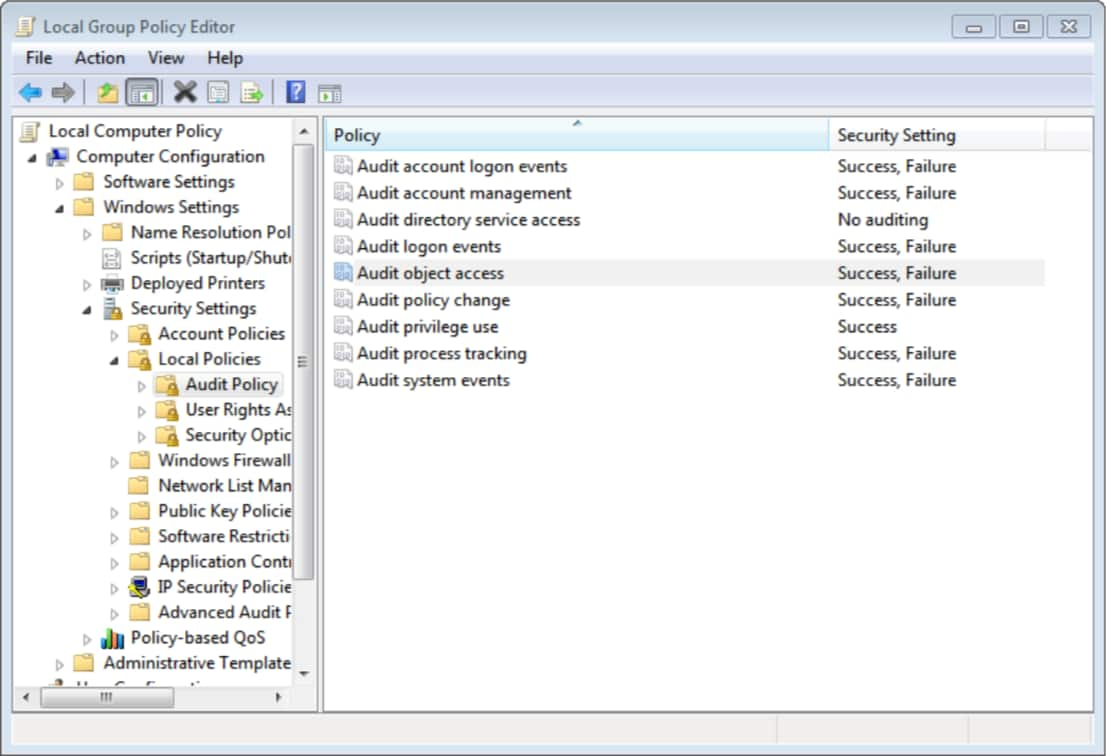
Go to Computer Configuration > Windows Settings > Security Settings > Local Policies > Audit Policy.
-
Edit the Audit object access policy and enable auditing of Success and Failure attempts.
The following display shows an example:

-
Open Windows Explorer and navigate to the file or folder you want to audit.
-
Right-click on the file or folder and select Properties .
-
Select the Security tab and click Advanced .
-
Select the Auditing tab and click Continue if prompted.
-
Perform one of the following operations:
- To set up auditing for a new user or group, click Add . In the Enter the object name to select field, type the name of the user or group that you want to audit, then click OK .
- To remove auditing for an existing group or user, highlight the group or user name, click Remove , and then click OK . You can skip remaining steps.
- To view or change auditing for an existing group or user, click its name and then click Edit.
-
In the Apply onto box, click the location that you want to audit.
-
In the Access box, indicate what actions you want to audit by selecting the appropriate check boxes.
-
If you want to prevent subordinate files and subfolders of the original object from inheriting audit settings, select the Apply these auditing entries to objects and/or containers within this container only check box.
Topic revision: 09 Jun 2022, SheriffCyberSecurity