Previous Next Sheriff CSM™ Deploy Sheriff HIDS Agents You can deploy a Sheriff HIDS agent to a host
-
Through the Getting Started Wizard
This option supports deployment to Windows hosts and agentless deployment to Linux hosts. For instructions, see Deploying HIDS to Servers, in the Getting Started Wizard topic. -
From the Asset List View
This option supports deployment to Microsoft Windows servers only. For instructions, see Deploying HIDS Agents in Asset Management. -
From the HIDS management view
This option supports deployment to Windows and Linux hosts.


- If using any network accelerator devices in the environment, you must add Sheriff CSM Sensor (Deputy) to their whitelist. This is because the Sheriff CSM Sensor utilizes SMB (Server Message Block) to transfer the HIDS agent installation package to the Windows machine. If the network accelerator tries to optimize the traffic from the Sheriff CSM Sensor, it may cause the HIDS deployment to fail.
-
The operating system must be one of the following
- Microsoft Windows XP
- Windows 7, 8, or 10
- Windows Server 2003, 2008R2, or 2012R2
-
You need to use a user account that belongs to the same Administrators group as the local Administrator account.
Note: For security reasons, the local Administrator account is disabled by default on all versions of Windows currently in mainstream support. In order for the HIDS deployment to succeed, you need to enable the local Administrator account (not recommended), or create a user account and add it to the built-in Administrators group.
-
You must have changed the target Windows machine based on the steps below.
-
Go to Control Panel > Folder Options > View.
-
Deselect Use simple file sharing.
-
Go to Control Panel > Windows Firewall > Exceptions.
-
Select File and Printer Sharing.
-
Go to Control Panel > Folder Options > View.
-
Deselect Use Sharing Wizard (Recommended).
-
Go to Control Panel > System and Security > Windows Firewall > Advanced Settings > Inbound Rules.
-
Enable File and Printer Sharing (SMB-In).
-
Go to Control Panel > User Accounts > Change User Account Control Settings.
-
Move the slider to Never notify.
-
Go to Control Panel > Windows Firewall > Advanced Settings > Inbound Rules.
-
Enable File and Printer Sharing (SMB-In).
- To allow NTLMv2 security, run gpedit.msc.
-
Go to Local Security > Computer Configuration > Windows Settings > Security Settings > Local Policies > Security Options and change these settings.
-
Network Security: Minimum session security for NTLMSPP based (including secure RPC) clients,select
- Require NTLMv2 session security
- Require 128-bit encryption
-
Network Security: Minimum session security for NTLMSPP based (including secure RPC) servers, select
- Require NTLMv2 session security
- Require 128-bit encryption
-
Network Security: LAN Manager Authentication level, select
- Send NTLMv2 response only\refuse LM & NTLM<
-
-
Go to Control Panel Folder. Options View
-
Deselect Use Sharing Wizard (Recommended).
-
Go to Control Panel System and Security Windows Firewall Advanced Settings Inbound Rules.
-
Enable File and Printer Sharing (SMB-In).
-
Enable Windows Management Instrumentation (WMI) entry.
-
Go to Control Panel User Accounts Change User Account Control Settings.
- Move the slider to Never notify.
-
Open Group Policy.
- Go to Local Policies Security Options
- Set Network access: Shares that can be accessed anonymously
- Set User Account Control: Run all administrators in Admin Approval Mode to
- Apply changes and restart the machine.
-
- Go to Environment > Detection.
-
Go to HIDS > Agents > Agent Control > Add Agent.
-
On New HIDS Agent, select the host from the asset tree.
Sheriff CSM populates Agent Name with the host name, and IP/CIDR with the host IP address automatically.
-
Click Save.
Sheriff CSM adds the new agent to the list.
- To deploy the agent, click the
 button in the Actions column.
-
In Automatic Deployment for Windows, type the Domain (optional), User, and Password of the host; then click Save.
Sheriff CSM assembles a preconfigured binary file and deploys it to the host.
-
Alternatively, to download the preconfigured binary file, click the
 button in the Actions column.
Your browser downloads the file automatically or prompts you for the download.
-
Transfer the file, named ossec_installer_<agent_id>.exe, to the Microsoft Windows host.
-
On the Windows host, double-click to run the executable.
The installer runs in a console briefly, then displays a progress bar until completion.

ossec-hids-agent installer file from the OSSEC's Downloads page directly, and then follow their instructions to complete the installation.
After you have successfully installed the HIDS agent on the Linux host, perform the steps below to connect it to the Sheriff CSM.
To add the HIDS agent to Sheriff CSM -
Go to Environment > Detection.
-
Go to HIDS > Agents > Agent Control > Add Agent.
-
On New HIDS Agent, select the host from the asset tree.
Sheriff CSM populates Agent Name with the host name, and IP/CIDR with the host IP address automatically.
-
Click Save.
Sheriff CSM adds the new agent to the list.
-
To extract the key for the agent, click the
 button in the Actions column, and then copy the key that displays. Show me.
 -
Login to the Linux host, run
/var/ossec/bin/manage_agents,and then enterIto import the key you copied in the previous step.Note: On some installations, Centos, for example, the command may be
manage_clientinstead ofmanage_agents. -
Edit
/var/ossec/etc/ossec-agent.confto change the server IP address to the Sheriff CSM. -
Start the HIDS agent if it is not already running:
service ossec start
chkconfig ossec-hids on
-
On the Sheriff CSM, go to Environment > Detection, click HIDS Control, and then Restart.
2015/09/18 09:07:38 ossec-agent: INFO: Started (pid: 3440).
2015/09/18 09:07:38 ossec-agent(4102): INFO: Connected to the server (10.47.30.100:1514).
To check the agent log file on the Windows hosts
- Go to Start > OSSEC > Manage Agent.
-
In OSSEC Agent Manager, click View and select View Logs.
This opens the
ossec.logfile on the agent.
- Login to the Linux host.
-
In a console, enter the following:
more /var/ossec/logs/ossec.log
-
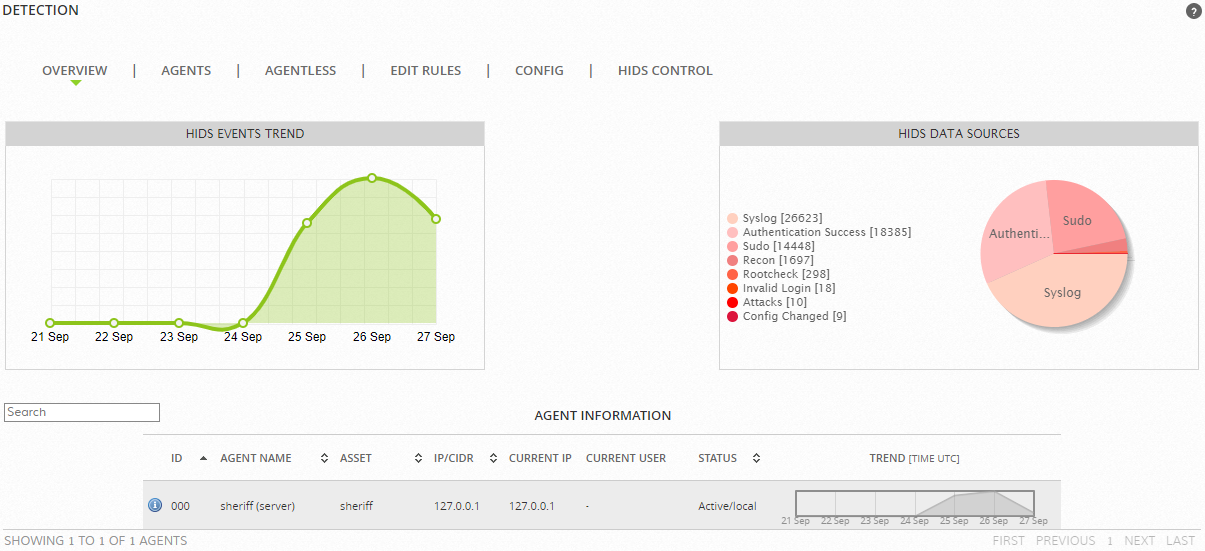
Go to Environment > Detection.
The Overview page for HIDS displays.
-
Ensure that the Status column for the deployed agents display Active, and the Trend chart is not empty.

- To see the Sheriff HIDS events from a specific agent, go to Analysis > Security Events (SIEM).
-
In Data Sources, select Sheriff HIDS; change Event Name to Src IP, enter the IP addresses of the HIDS Agent, and then click Go.
The Sheriff HIDS events from the particular agent display.
| Message | Explanation |
|---|---|
| Your request has been processed | Success |
| Sorry, operation was not completed due to an error when processing the request | No data returned from DB |
| The following errors occurred | A list of pertinent errors |
| Your changes have been saved | Successful save |
| illegal: User | User validation error |
| illegal: Password | Password validation error |
| illegal: Domain | Domain validation error |
Topic revision: 02 May 2022, SheriffCyberSecurity